| Dieser Artikel oder Abschnitt wird gerade durch den User Frosch67 bearbeitet. Um Bearbeitungskonflikte zu vermeiden, warte bitte mit Änderungen, bis diese Markierung entfernt ist, oder wende dich an den Bearbeiter. | Seite zuletzt bearbeitet von Frosch67 vor: 5374 Tagen |
Hinweis:
Dieser Artikel soll eine Kurzanleitung zu DMXControl sein. Inhalt: Programmierung von cues und einer Show
Wichtiger Hinweis: Dieser Artikel wurde mit Hilfe von FreeTranslation.com übersetzt und sehr viele Inhalte müssen noch angepasst werden, also ... jeder kann ja einen Satz übersetzen/korrigieren
DMXControl 3 Lektion9
Überblick
Der vorherig lession hat in einfache Stichwörter eingeführt. In dieser Lektion erklären wir einigen raffinierteren Kennzeichen von Szenen, z.B. das fächelnde Kennzeichen. Mit Fächeln können Sie eindrucksvolle Wirkungen mit Gruppen von Lampen, z.B. Regenbogen bewirkt schaffen oder winkt.
Lektion 9: Fanning, chasers and other effects
DMXControl 3 dehnt den Bereich von Szenen in so aus, der dynamische Wirkungen und eingeschlossen werden können, dass Sie gewisse Algorithmen für die Eigenschaften verwenden können (DMX schätzt) der eingeschlossener Vorrichtungen resp. Gruppen. Dies erlaubt Ihnen, sehr komplizierte Szene mit wenigem Mausklicken zu schaffen. Glauben Sie es nicht? Führen wir vor, wie es arbeitet!
Fanning
Der erste Mechanismus fächelt. Fächelnmittel von technischem Standpunkt, eine Wert oder Domäne zu einer Gruppe von Vorrichtungen zu spalten. Wir unterscheiden zwischen linearem und abwechselndem Fächeln, sehen, dass das Folgend von Tischen das Syntaxelement erklärend.
Linear Fanning
| Syntax | Example | Description |
|---|---|---|
| > | 50 > 100 | linear interpolation |
| <> | 50 <> 100 | linear interpolation: marginal devices: 100, central devices 50 |
| >< | 50 >< 100 | contrary: marginal devices: 50, central devices 100 |
alternate fanning
| Syntax | Example | Description |
|---|---|---|
| # | 50 # 100 | alternate values 100/50/100/50 ... |
| # # | 100 # 50 # 0 | alternate values 100/50/0/100/50/0 ... |
Wie arbeitet es?
Lässt, annimmt, dass wir ein Stichwort haben wollen, wo die 8 RGB Nennwerte von rot in der Mitte zu Blau an den Enden verwelkt werden müssen.
How many actions are needed for programming? 8? 16? 32? The answer is: three. We will apply linear fanning by "><" where we separate the marginal devices from central devices. The actions:
- select the group "RGB pars"
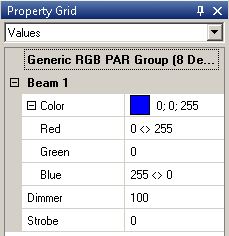
- Go to property grid panel and type in for red color "0<>255"
- type for blue color "255<>0"
Here is the result in property grid:
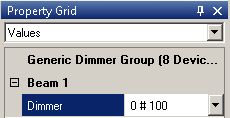
Let's make another excercise with alternate fanning. The task is switching on each second lamp (i.e. setting dimmer to 100%).
There is a simple solution: Insert "0#100" into the dimmer value text field.
Effects and attachables
With fanning you can create static cues. The attachables panels provides some effects that can be used for dynamic changes within a cue.
Remember: Attachables will be summed to the values that are manually adjusted. (If the device has a dimmer of 30% adjusted und you add a sinus with amplitude of 20%, the brightness minimum value will be 30%, the maximum value 50%)
Let's have an example: You want to have a blinking effects with all frontlight lamps with lowest brightness for the central devices.
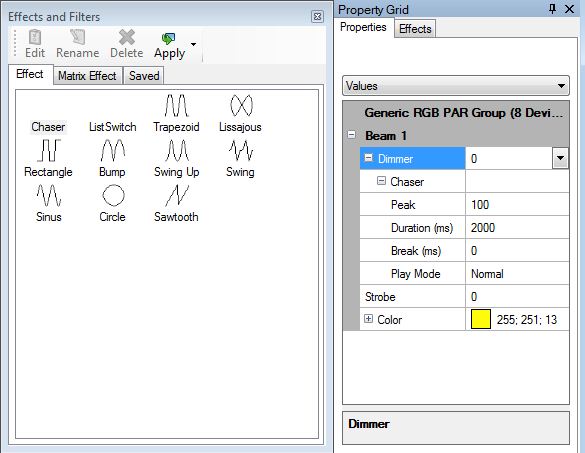
Here we will use the "attachable" pannel showing some effects such as "Sinus", Trapezoid", "Sawtooth" etc. Per drag&drop we can load the Sinus effect to the dimmer attribute within property grid.
Following settings are nessecary (the amplitude will varybetween 30 and 100 %):
Try it!
Hint: Press the Del key to remove the effect from the attribute.
| Attribut | Example | Description |
|---|---|---|
| Amplitude | 50 > 100 | value interval for selected attribute; can be set to negative value too |
| Offset | [0..100] | offset between group elements |
| Phase | [0..1] | ? |
| Frequency | [0..1] | cycle speed |
Tipp: By fanning the offset you get interesting chasers.
In order to illustrate the power of this concept we have listed following use cases for you:
| Use case | Visual effect description | Amplitude | Offset | Phase | Frequency |
|---|---|---|---|---|---|
| Jump Effect: Dimmer should slowly fade to 0 and will jump to full value | set dimmer to 100, drag sawtooth effect to dimmer attribute | -100 |
Zusätzliche Themen (von beta testern)
Übung
- Try to apply fanning to moving lights. That rocks! ;)
Zusätzliche Links
Zertifikat
Ich habe die Themen in dieser Lektion verstanden und möchte mit der nächsten Lektion weitermachen: Lektion10: Die Programmieransicht


