Julien (Diskussion | Beiträge) K (hat „Einsteiger:Lesson13“ nach „Lektion 13“ verschoben) |
|||
| Zeile 10: | Zeile 10: | ||
= Überblick = | = Überblick = | ||
In | In dieser Lektion erklären wir wie man Presets wieder verwenden kann um eine Show schneller zu programmieren. | ||
= Lektion 13: = | = Lektion 13: = | ||
Version vom 14. September 2011, 21:03 Uhr
Hinweis:
Dieser Artikel soll eine Kurzanleitung zu DMXControl sein. Inhalt: Programmierung von cues und einer Show
Wichtiger Hinweis: Dieser Artikel ist zm Teil eine 1:1 Kopie oder wurde mit Hilfe von FreeTranslation.com übersetzt und sehr viele Inhalte müssen noch angepasst werden, also ... jeder kann ja mal einen Satz übersetzen/korrigieren und entfernt anschließend diesen Hinweis
| [[Bild:{{{Logo}}}|48px|link=]] | {{{Überschrift}}} |
Überblick
In dieser Lektion erklären wir wie man Presets wieder verwenden kann um eine Show schneller zu programmieren.
Lektion 13:
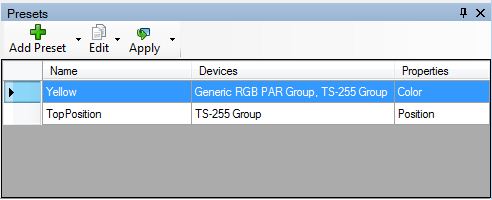
Presets are very similar to cues. You can create them in the same way, see lesson 8. Similar the the button "Create cue" here you find the button "Create preset". You can use presets to store different values for the parameters of your fixtures. You can store:
- moving light positions
- colors of RGB Pars
- combination of gobo, shutter on and color
- generic chasers (where you later only replace/modify the color)
- or simply intensities of your conventional fixtures
- etc.
The big advantage of using presets is, that it's referenced data. That means, whenever you record a cue using presets, not the actual values, but a link to the preset is stored. So keep in mind, if you change your preset, all cues that use this preset will use the new values. A simple example where presets can rapidly speed up programming would be: You've recorded a color of your cyc wash as a preset and used this preset in five cues. If you later decide to modify the cyc wash a bit, you just need to update one preset instead of five cues. However if you just want to change the color in one cue you can do that by overwriting the reference with manual data. (i hope!)
Recording Presets
Modifying Presets
Deleteing Presets
/*After you have created your presets you can use it in two (TODO: should be more than two scenarios) scenarios: using the complete preset or using of parts of a preset*/
Applying Presets
You can "drag&drop" a preset into your scene list. A copy of your "preset cue" will be inserted. All values from the preset are taken over into the new cue.
Applying Presets for Selected Fixtures Only
TODO: uhm should work, ha?
Applying Selected Parameters of Presets
It is also possible to take not the whole preset, but only a selected attribute from the preset for your current cue. For this case you drag&drop the preset to your dedicated attribute, e.g. the dimmer. Please have a view to the programmer: You can see that in our case the dimmer value was taken from the preset.
Applying Selected Parameters of Presets for Selected Fixtures Only
TODO: i guess this should work, too.
/*Attention Presets resp. values from presets are taken as references to original preset. If you modidy afterwards the preset, all reference values are changed automatically. This behaviour can be beneficially applied when adapting a show by only modifying few presets.*/
Zusätzliche Themen (von beta testern)
- yah first release the beta, than we'll see what to add here...
- TODO: some paragraphs sound odd, going to change that later ...
- TODO: check terms that dmxc uses, here is what i normaly use:
- - intensity of fixture or just intensity instead of dimmer value
- - parameters are pan/tilt, color, intensity
- - pan/tilt: focus?
- - attributes: follow, wait, trigger in cue list...
- -
- TODO: remove attention notice. That should be clear to the reader till there.
- TODO: add some better explanation what presets are.
- TODO: capitalization of paragraph heading?
Übung
- Create some presets and use it in your scene list
Zusätzliche Links
Zertifikat
Ich habe die Themen in dieser Lektion verstanden und möchte mit der nächsten Lektion weitermachen: Lektion 14
