KKeine Bearbeitungszusammenfassung |
KKeine Bearbeitungszusammenfassung |
||
| Zeile 45: | Zeile 45: | ||
Wie arbeitet es? | Wie arbeitet es? | ||
== TEST == | |||
Wir wollen eine Szene mit 8x RGB Pars erstellen, die von rot in der Mitte nach aussen in blau überblendet. | Wir wollen eine Szene mit 8x RGB Pars erstellen, die von rot in der Mitte nach aussen in blau überblendet. | ||
Version vom 13. Juni 2011, 10:28 Uhr
Hinweis:
Dieser Artikel soll eine Kurzanleitung zu DMXControl sein. Inhalt: Programmierung von cues und einer Show
DMXControl 3 Lektion9
Überblick
In der vorherigen Lektion wurden die einfachen Szenen vorgestellt. In dieser Lektion erklären wir einige komplexe Szenen, z.B. das "Fanning". Mit "Fanning" erstellst Du eindrucksvolle Gruppeneffekte, z.B. Regenbogen- oder Welleneffekte.
Lektion 9: Fanning, Chasers und andere Effekte
DMXControl 3 extends the scope of scenes in that way that dynamic effects can be included and that you can apply certain algorithms for the attributes (DMX values) of included devices resp. groups. This allows you to create highly complex scene with few mouse clicks. Don't believe it? Let's demonstrate how it works!
Fanning
The first mechanism is fanning. Fanning means from technical point of view to split a value oder domain to a group of devices. We distinguish between linear and alternate fanning, see following tables explaining the syntax element.
Linear Fanning
| Syntax | Example | Description |
|---|---|---|
| > | 50 > 100 | linear interpolation |
| <> | 50 <> 100 | linear interpolation: marginal devices: 100, central devices 50 |
| >< | 50 >< 100 | contrary: marginal devices: 50, central devices 100 |
alternate fanning
| Syntax | Example | Description |
|---|---|---|
| # | 50 # 100 | alternate values 100/50/100/50 ... |
| # # | 100 # 50 # 0 | alternate values 100/50/0/100/50/0 ... |
Wie arbeitet es?
TEST
Wir wollen eine Szene mit 8x RGB Pars erstellen, die von rot in der Mitte nach aussen in blau überblendet.
How many actions are needed for programming? 8? 16? 32? The answer is: three. We will apply linear fanning by "><" where we separate the marginal devices from central devices. The actions:
- select the group "RGB pars"
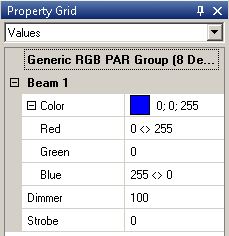
- Go to property grid panel and type in for red color "0<>255"
- type for blue color "255<>0"
Here is the result in property grid:
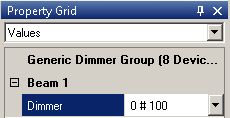
Let's make another excercise with alternate fanning. The task is switching on each second lamp (i.e. setting dimmer to 100%).
There is a simple solution: Insert "0#100" into the dimmer value text field.
Effects and attachables
With fanning you can create static cues. The attachables panels provides some effects that can be used for dynamic changes within a cue.
Remember: Attachables will be summed to the values that are manually adjusted. (If the device has a dimmer of 30% adjusted und you add a sinus with amplitude of 20%, the brightness minimum value will be 30%, the maximum value 50%)
Let's have an example: You want to have a blinking effects with all frontlight lamps with lowest brightness for the central devices.
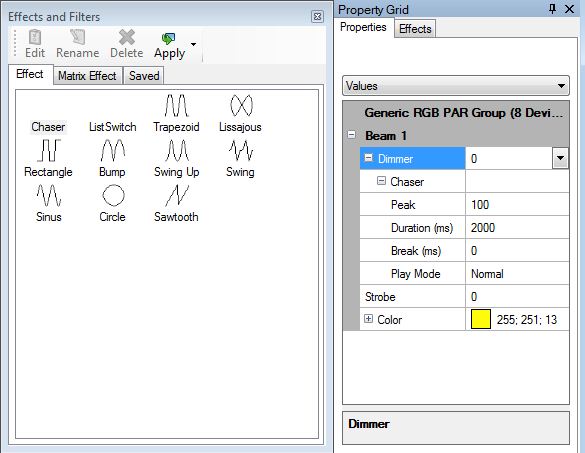
Here we will use the "attachable" pannel showing some effects such as "Sinus", Trapezoid", "Sawtooth" etc. Per drag&drop we can load the Sinus effect to the dimmer attribute within property grid.
Following settings are nessecary (the amplitude will varybetween 30 and 100 %):
Try it!
Hint: Press the Del key to remove the effect from the attribute.
| Attribut | Example | Description |
|---|---|---|
| Amplitude | 50 > 100 | value interval for selected attribute; can be set to negative value too |
| Offset | [0..100] | offset between group elements |
| Phase | [0..1] | ? |
| Frequency | [0..1] | cycle speed |
Tipp: By fanning the offset you get interesting chasers.
In order to illustrate the power of this concept we have listed following use cases for you:
| Use case | Visual effect description | Amplitude | Offset | Phase | Frequency |
|---|---|---|---|---|---|
| Jump Effect: Dimmer should slowly fade to 0 and will jump to full value | set dimmer to 100, drag sawtooth effect to dimmer attribute | -100 |
Zusätzliche Themen (von beta testern)
Übung
- Try to apply fanning to moving lights. That rocks! ;)
Zusätzliche Links
Zertifikat
Ich habe die Themen in dieser Lektion verstanden und möchte mit der nächsten Lektion weitermachen: Lektion10: Die Programmieransicht


