KKeine Bearbeitungszusammenfassung |
Keine Bearbeitungszusammenfassung |
||
| Zeile 1: | Zeile 1: | ||
{{Stub}} | {{Stub}} | ||
{{Hinweis|Dieser Artikel soll eine Kurzanleitung zu DMXControl sein. Inhalt: Ausführung einer Show und Erweiterungen }} | {{Hinweis|Dieser Artikel soll eine Kurzanleitung zu DMXControl sein. Inhalt: Ausführung einer Show und Erweiterungen }} | ||
{{Wichtig|Dieser Artikel ist zm Teil eine 1:1 Kopie oder wurde mit Hilfe von FreeTranslation.com übersetzt und sehr viele Inhalte müssen noch angepasst werden, also ... jeder kann ja mal einen Satz übersetzen/korrigieren und entfernt anschließend diesen Hinweis}} | |||
<h2 style="{{Style:Hauptseite:Überschrift}}" align="center">DMXControl 3 Lektion19</h2> | <h2 style="{{Style:Hauptseite:Überschrift}}" align="center">DMXControl 3 Lektion19</h2> | ||
<div style="{{Style:Hauptseite:Box}} background-color:#f5faff"> | <div style="{{Style:Hauptseite:Box}} background-color:#f5faff"> | ||
| Zeile 7: | Zeile 8: | ||
= Überblick = | = Überblick = | ||
In this lesson some additional clients are in focus. The client/server concept of DMXControl allows the connection to other clients (Smartphones, Tabs, etc.) in simple way. | |||
= Lektion 19: = | = Lektion 19: = | ||
in development: | |||
* [http://www.dmxcontrol.de/wiki/Projekte/DMXControl-for-Android-Projekt DMXControl-for-Android-Projekt] | |||
* [http://www.hexler.net TouchOSC] | |||
Both smartphone apps (clients) communicate via OSC with DMXControl 3. | |||
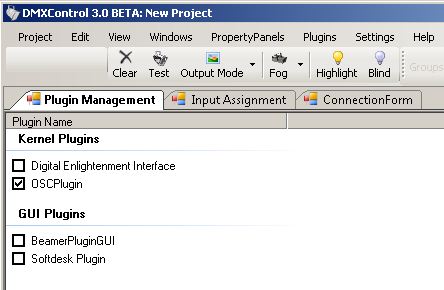
Therefore you have to enable the OSC plugin via "plugin manager", see following figure: | |||
[[Datei:DMXC3L19_OSC1.JPG]] | |||
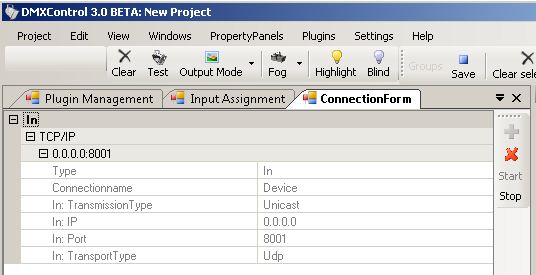
Now, you should define the IP connection in the panel "connection form". Press the "+" button to create a new connention. | |||
In the first approach we use unicast with UDP. Please let the IP address on 0.0.0.0, but set the correct port where your client sends the OSC messages. Now you can start (activate) this connection by a click to start button: | |||
[[Datei:DMXC3L19_OSC2.JPG]] | |||
| Zeile 16: | Zeile 33: | ||
==Übung== | ==Übung== | ||
* | * Create ... | ||
==Zusätzliche Links== | ==Zusätzliche Links== | ||
Version vom 19. Mai 2011, 05:42 Uhr
Hinweis:
Dieser Artikel soll eine Kurzanleitung zu DMXControl sein. Inhalt: Ausführung einer Show und Erweiterungen
Wichtiger Hinweis: Dieser Artikel ist zm Teil eine 1:1 Kopie oder wurde mit Hilfe von FreeTranslation.com übersetzt und sehr viele Inhalte müssen noch angepasst werden, also ... jeder kann ja mal einen Satz übersetzen/korrigieren und entfernt anschließend diesen Hinweis
DMXControl 3 Lektion19
Überblick
In this lesson some additional clients are in focus. The client/server concept of DMXControl allows the connection to other clients (Smartphones, Tabs, etc.) in simple way.
Lektion 19:
in development:
Both smartphone apps (clients) communicate via OSC with DMXControl 3. Therefore you have to enable the OSC plugin via "plugin manager", see following figure:
Now, you should define the IP connection in the panel "connection form". Press the "+" button to create a new connention. In the first approach we use unicast with UDP. Please let the IP address on 0.0.0.0, but set the correct port where your client sends the OSC messages. Now you can start (activate) this connection by a click to start button:
Zusätzliche Themen (von beta testern)
Übung
- Create ...
Zusätzliche Links
Zertifikat
Ich habe die Themen in dieser Lektion verstanden und möchte mit der nächsten Lektion weitermachen: Lektion20:

